Setup Assistance
Welcome to
Gatherings VR
Installation Guide
Follow the guide, or jump to the section you need below. If you still can’t find an answer to your question, contact our events support team using the ‘Contact Support’ button below or on: [email protected]


1. Setting up
Already have a headset that you’ve previously set up?
Skip this section and head to: 2. Your Avatar
A.
Your Headset
What’s included
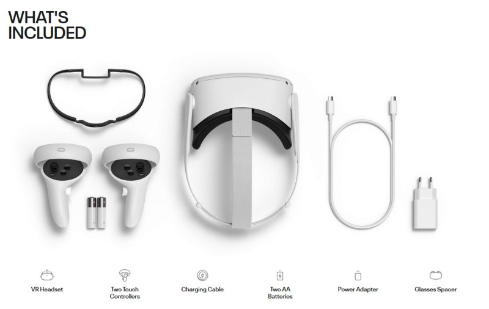
Remove the items from your Oculus Quest box.
- Remove the items from your Oculus Quest box
- Put your headset on charge by connecting it to the charging cable and power adapter
- Insert the 2 AA batteries into your two Touch Controllers.
- Insert the glasses spacer if you wear spectacles.
B.
Oculus Smartphone App
Make sure your mobile device is connected to Wi-Fi and has Bluetooth enabled.
Download the Oculus App onto your smartphone using the links provided below.
-
iPhone – Oculus on the App Store (apple.com)
-
Android – Oculus – Apps on Google Play
The first time you open the Oculus App you will be prompted to login using a Facebook account.
This is a requirement for all users of the Oculus Quest 2.
Please log in to your Facebook account if you have one already.
If you do not have a Facebook account, click the link below to set up an account:
Facebook – Create Account
Facebook – Login
Follow the steps on your Oculus App to set up your headset. You will need to pair your device with your smartphone so make sure you have turned your headset on.
If the Oculus App does not automatically prompt you to pair, look in the headset for a 5 digit code.
Go to the Oculus App, select ‘Devices’, select ‘Pair New Headset’ and type in the 5 digit code you see in the headset.
C.
Set Up of the Device
Power
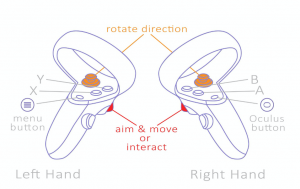
To turn your Oculus Quest headset on, press the power button on the side of the headset. The power indicator light above the power button should turn on. The power button and indicator are shown as per the image below.

Volume
The volume buttons can be found at the base of the headset, as shown per the image above.

Vision
To change the lens spacing on your Oculus Quest 2, gently adjust the lenses by shifting them together or apart. There are three lens spacing settings for Oculus Quest 2.
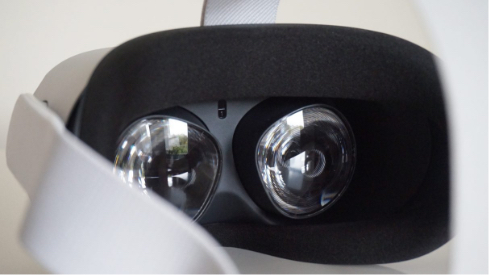
61 mm or smaller = 1 (narrowest, 58 mm)
61 mm to 66 mm = 2 (middle, 63 mm)
66 mm or larger = 3 (widest, 68 mm)
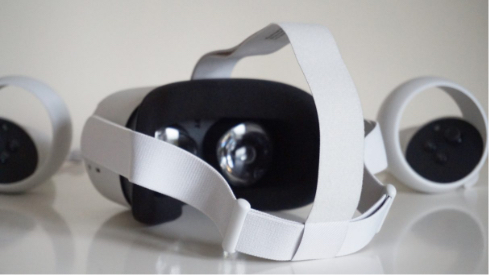
Headset Comfort
We recommend adjusting your Oculus Quest 2 for the best fit. Adjust the side straps first before moving on to the middle head strap. Adjust the headset to your personal specifications to improve clarity.
D.
Oculus Guardian Set Up
Confirm Floor Level
A virtual grid will appear around you. To confirm the floor level, reach down and touch the ground with one of your controllers. The grid should now be at floor level. If the grid appears to be at floor level, select ‘Confirm’ with your trigger button to advance.
If you are not happy with the floor level, select ‘Reset’ and try the process again.
We recommend setting a stationary boundary but if you would like to define your own boundary, Oculus recommends a space of 2 x 2 metres or greater for room scale experiences.
Define Boundary
To set a stationary boundary, a message will appear asking to ‘Define Play Area’, you will see a message displaying ‘Switch to Stationary Boundary’. Select this option by pressing your trigger button.
Another message will appear asking you to confirm your stationary boundary. If you are happy with your boundary, select ‘Confirm’ by pressing your trigger button.
You will now see a circle grid appear around you, your stationary boundary has been set.


Once you have set your guardian area, this will be locked and if you go near the edge of the boundary you will be alerted by a red grid wall. You can adjust your boundary at any time by heading to your Oculus settings.
 2. Your Avatar
Your Avatar is what represent’s you in Gatherings
This section is now about creating your virtual avatar via the Gatherings Companion Website
A.
Log In / Sign Up
Open the Gatherings website at:
account.gatheringsvr.com/login
You will receive a 6-digit Passcode to the email address supplied. If you cannot see this email, check your junk inbox.
Enter the 6-digit Passcode in the email to enter the Gatherings web portal.
Enter your First and Last Name, Job Title and Company.
Select your time zone.
Confirm that you are over 18 years old and have read and agreed to the Terms & Conditions.
B.
VR Avatar Creation
C.
Generate your Gatherings Key
After creating your Avatar, you will be provided a Gatherings Key to log in to your Gatherings account on the Oculus Quest 2 headset.
If you have an existing account and avatar, go to the next section.
3. Gatherings App
Now, download the VR app on your headset to jump into Gatherings.
A.
Download GatheringsVR
Put on your headset, set up your guardian and you will see the Oculus Quest 2 home screen within your headset. You will see a menu bar similar to the image below.

If you cannot see the menu bar above, press the Oculus button on your right-hand controller to activate it. See button labelled ‘3’ in image below.
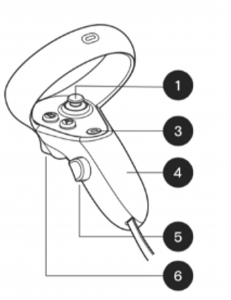
Use your pointer to hover over the store icon and press the trigger button to select. See button labelled ‘6’ on image above. The trigger button is on the back of your controller and the store icon looks like a shopping bag as shown in the image below.

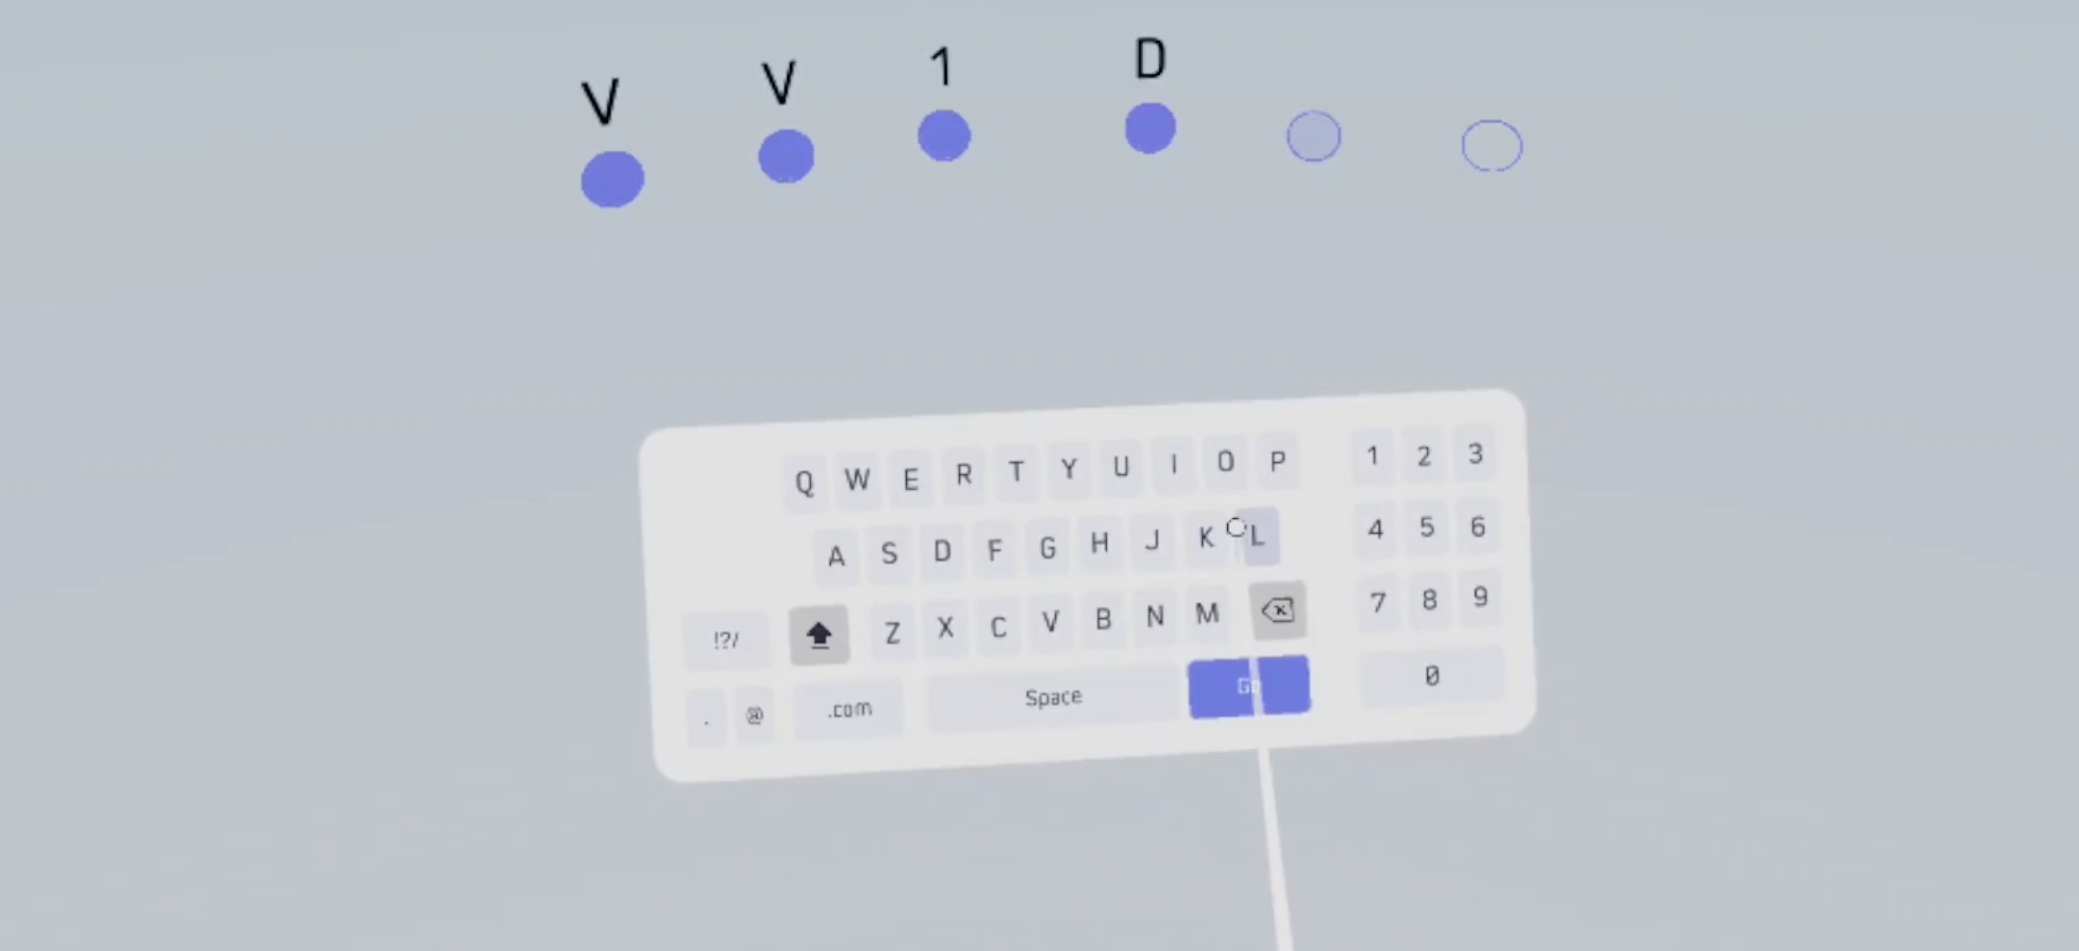
Behind the menu, a screen will appear with items from the store. In the top right corner, press the trigger button to select the search bar.
Press the trigger button again to select the search bar and the keypad will pop up for you to begin typing.
Press the trigger button to select the keys on the keypad, and type:
gatheringsvr
Press the trigger button to select the blue ‘Go’ button on the keypad.
B.
Opening Gatherings
On the Oculus Quest 2 home screen, you will see the menu below.

If you cannot see the menu, press the Oculus button on your right hand controller to open it. See button labelled ‘3’ above.
Use your pointer to hover over the ‘Apps’ icon and press the trigger button to select ‘Apps’ on the menu. See button labelled ‘6’ above. The ‘Apps’ icon is visible below.

You will now see the Gatherings App.
Select the Gatherings App by pressing your trigger button to install, press the trigger button again to open Gatherings.
You will now see a screen explaining why you will need to allow access to your microphone for your Gatherings experience. Select ‘Next’.
You will now see a screen with ‘Allow Permissions – Allow VR Gatherings to record audio’
Select ‘Allow’. If you do not select allow you will not be able to proceed with installation.
C.
Logging in
The Gatherings App will now start and ask you to enter a 6 digit Gatherings Key
Enter the 6 digit Gatherings Key from the website portal. You will find this under ‘Devices’.
If your screen freezes on ‘Update Complete’, please quit by pressing the Oculus button on your right hand controller, select ‘Quit’ and reopen Gatherings.
You’re now fully setup.
Enjoy your time in Gatherings!
D.
Learning Controls
When you enter Gatherings, you will be prompted to complete the Tutorial. The Tutorial only takes 1-3 minutes, and we highly recommend completing it.
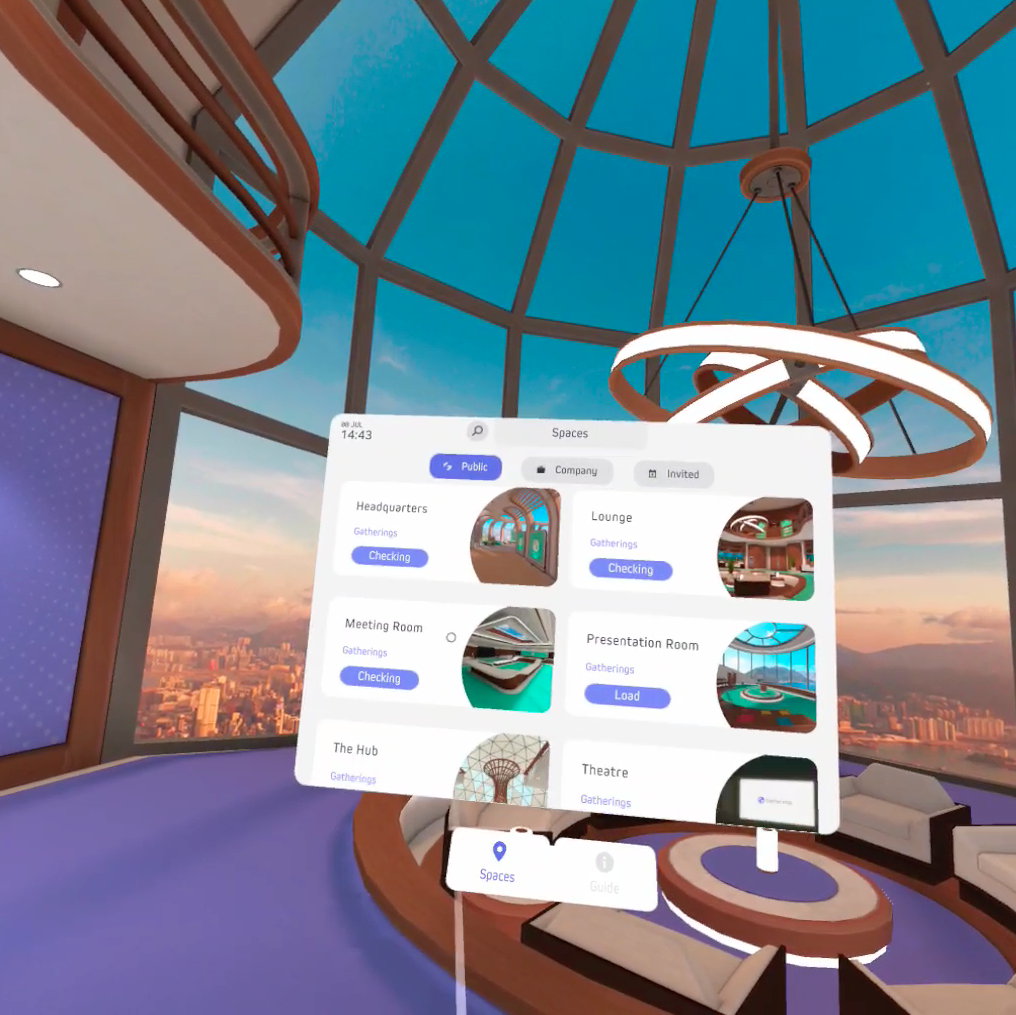
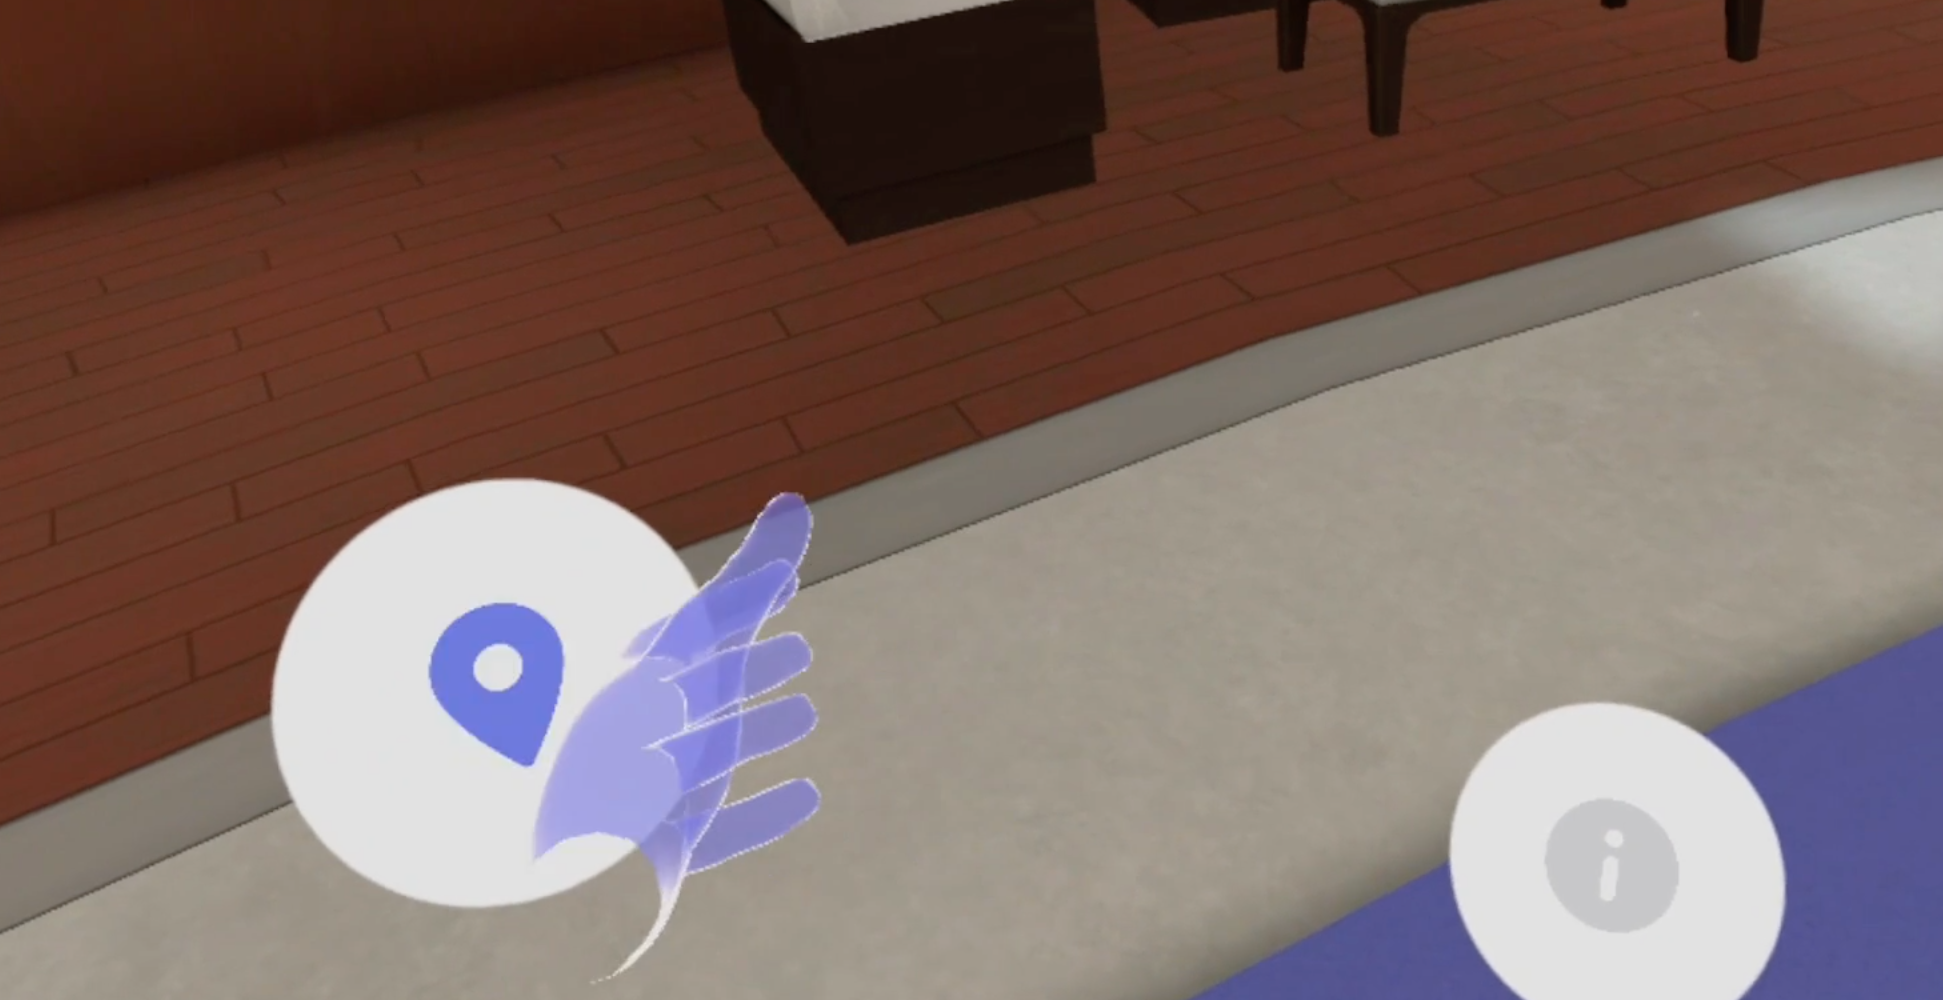
If you ever need to revisit the Tutorial, it can be found in your ‘Spaces’ on your location menu on your left-hand controller. See button labelled ‘2’ in image below.
 Tips & Tricks

Keep your headset charged
We’d recommend charging your headset when you’re not in VR. You can keep your VR headset charged even when it’s on – just make sure the cable stretches comfortably to your position.

Stay muted where possible
To help reduce any background noise for others, we reccomend to stay muted where possible – just as you would in Zoom or Teams.

Plug in headphones
For clearer audio during your experience, we recommend plugging in your own headphones to your headset.

Tutorial & guide
Learn the controls through the welcome tutorial when first entering Gatherings, or refer back to any of the controls within the ‘Guide’ section, found as a menu tab, in VR.
Getting started
Watch these videos to get into Gatherings quickly and easily
How to login to Gatherings VR
Finding your feet
Learn the basic controls
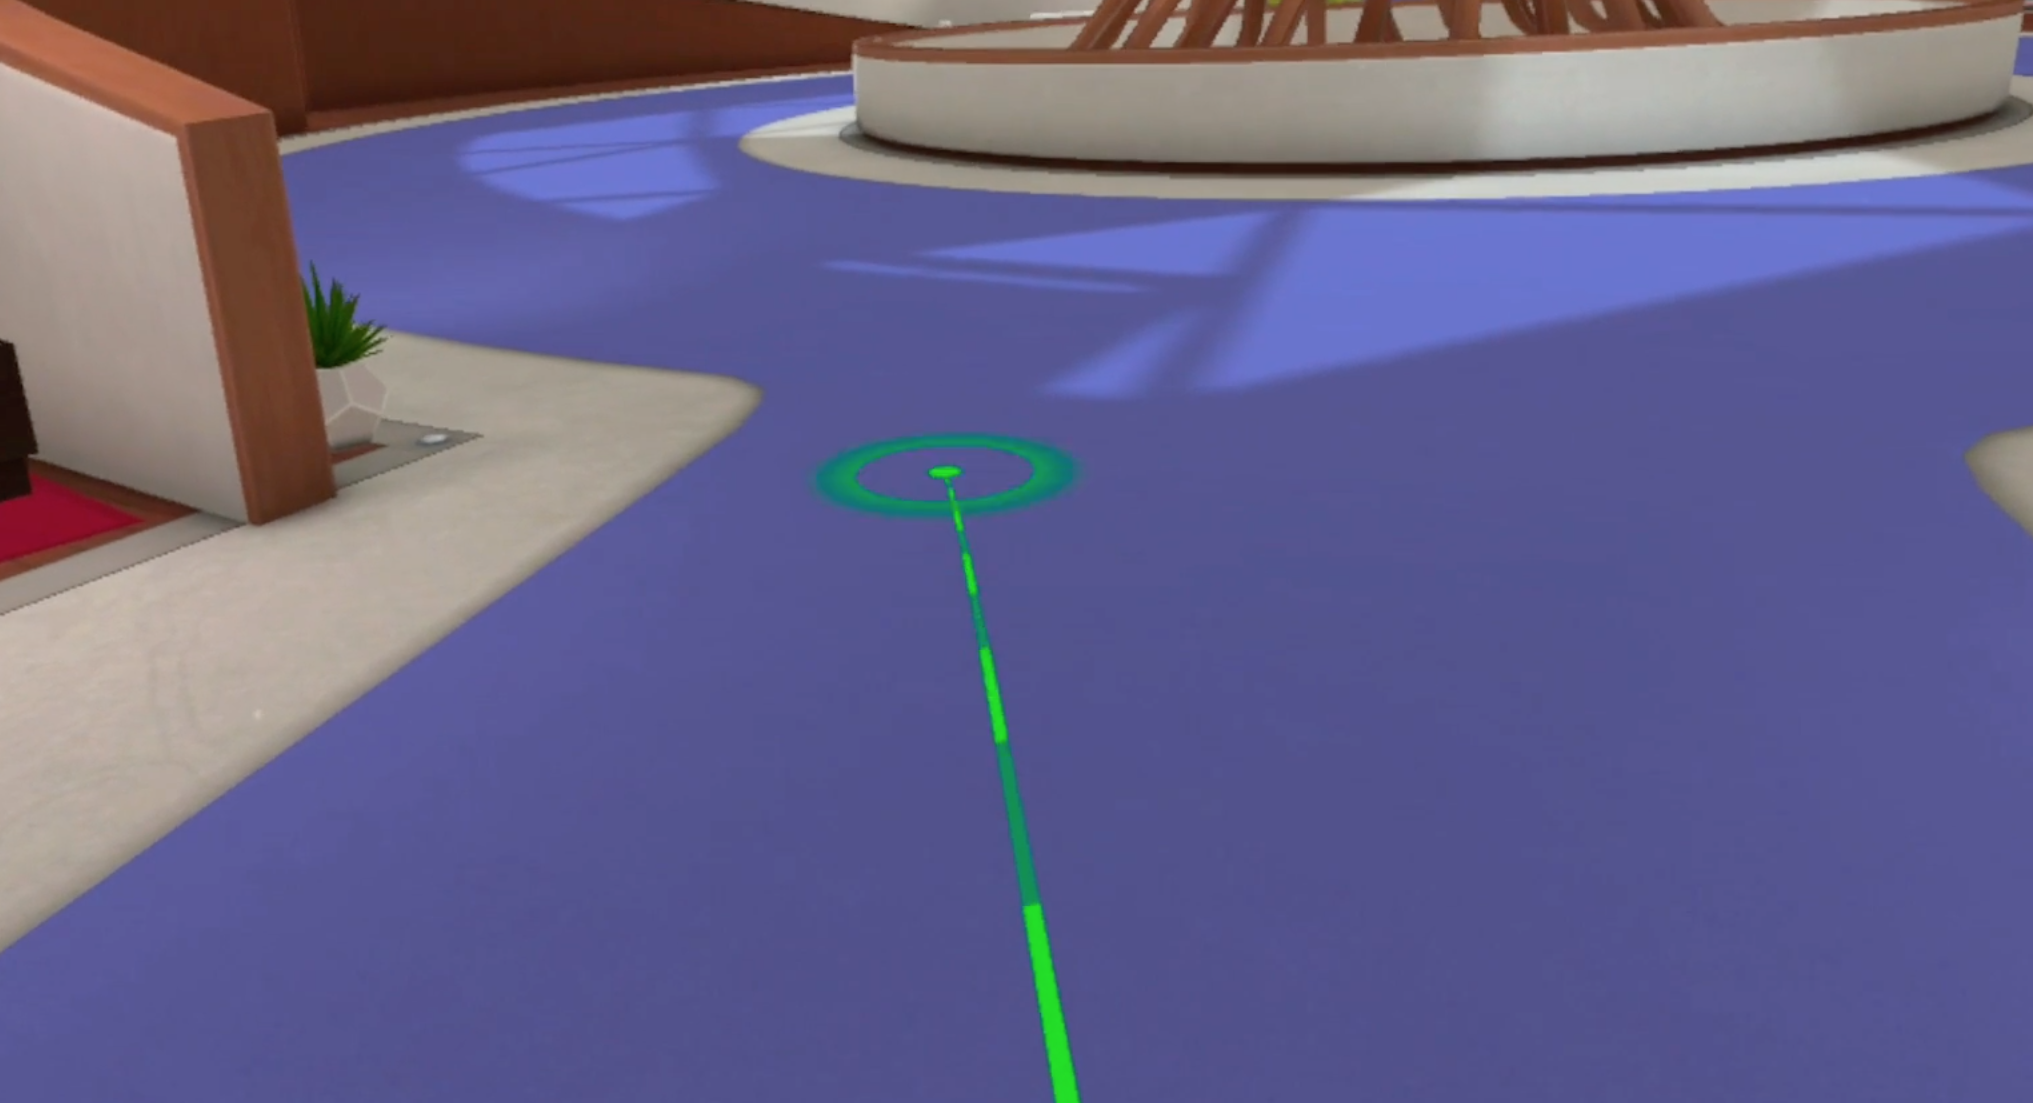
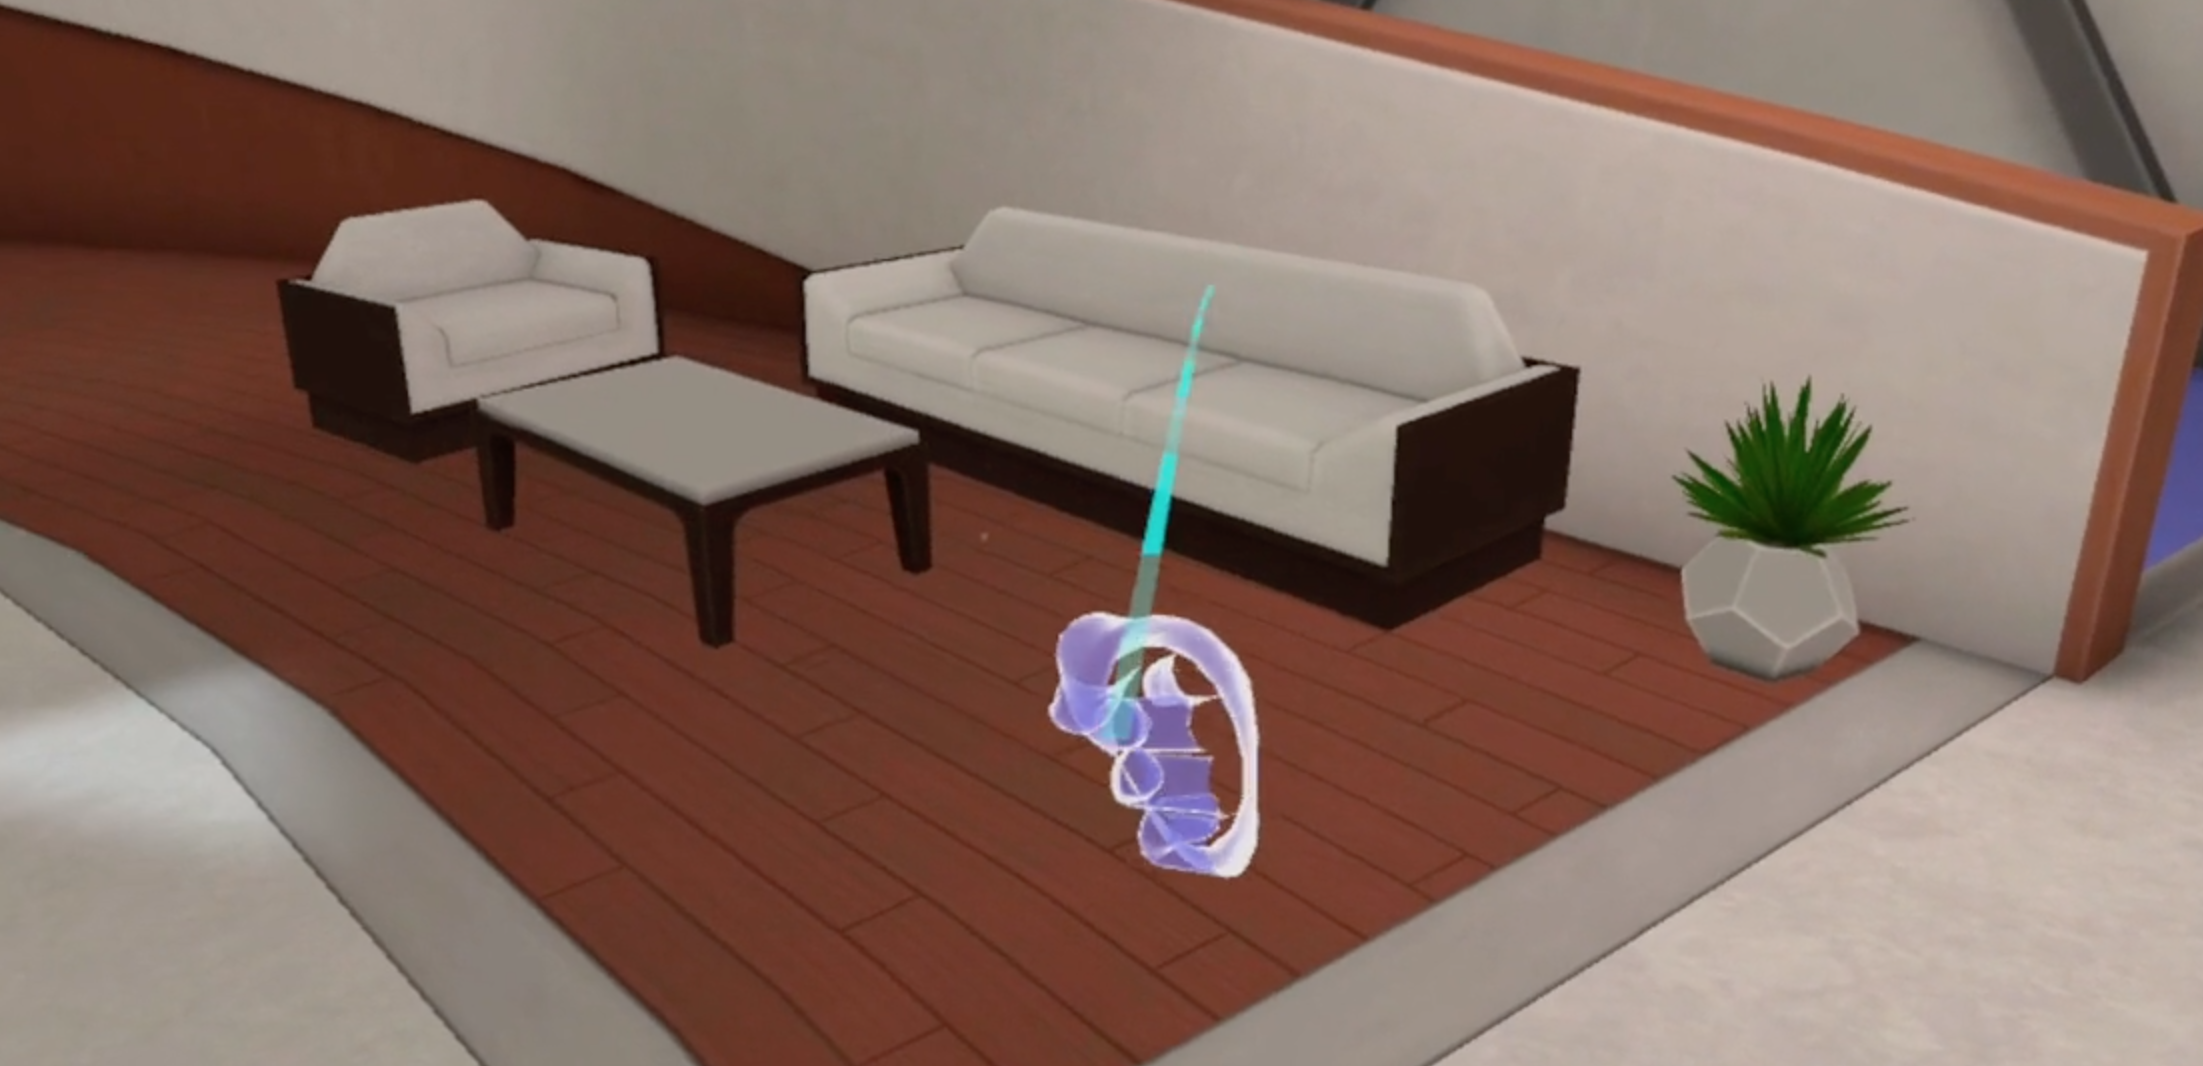
How to teleport around the spaces

How to mute and unmute yourself
How to sit down on seats
Additional help
Build up your knowledge with these quick how-to videos
How to activate your personal menu
FAQ
Need some help with your headset or have a burning question you need answered?
Just click on one of the sections below to find the answer.
Your headset
What devices can run Gatherings?
Connect your Oculus Quest 2 or Quest to Wi-Fi
To connect from your Oculus Quest 2 or Quest:
T1. Press the Oculus icon on your right Touch controller to pull up your universal menu.
2. Select Settings then select Wi-Fi.
3. Select the Wi-Fi network you want to connect to then enter the Wi-Fi password.
4. Select Connect.
To connect to Wi-Fi from your Oculus mobile app:
1. Turn on your headset and open the Oculus mobile app.
2. Tap Devices then tap the headset that you are currently using.
3. Tap Wi-Fi then tap the new Wi-Fi network you want to connect to and enter the password.
If you experience trouble connecting your headset to Wi-Fi, try these troubleshooting tips.
Can I replay the Oculus Quest tutorial?
<
<– Press the Oculus button (on right hand controller)
<– Open up the Library
< – Scroll to locate the tutorial apps, “First Steps” and “Fit & Focus”
How do I charge my headset?
My headset isn’t turning on
My sound isn’t working
My head positioning seems off
– Open up the Settings
– Select Guardian
My virtual and actual room don’t line up
Setting up
What speed of Wi-Fi is required to run Gatherings?
Do I need an Oculus account?
How do I install Gatherings VR?
How do I know I’m on the most up-to-date version of Gatherings?
How much space on my headset do I need to download Gatherings VR?
How do I exit and quit Gatherings VR?
Logging in
I have an Gatherings Key, where do I enter it?
How do I get an Gatherings Key?
I have been locked-out after a number of failed login attempts
Controls
How can I take a photo or record a video in VR?
How can I mute and unmute myself?
How do I travel to other spaces?
We’d recommend to keep users under 30 in each of the spaces for the most optimum experience.
How do I activate the personal menu?
I can’t reach things in the virtual space because they’re too far away or in a wall


1. Setting up
Already have a headset that you’ve set up?
Skip this section and head to: 2. Your Avatar
A.
Title
Description
B.
Title
Description
2. Your Avatar
Your Avatar is what will represent you in Gatherings
This section is now about creating your virtual avatar.
A.
Title
Description
B.
Title 2
Description 2
3. Gatherings VR App
Now, download the VR app on your headset to jump into Gatherings.
1
Title 1
Description 1
Tips & Tricks
Your Avatar is what will represent you in Gatherings
This section is now about creating your virtual avatar.
Keep your headset charged
We’d recommend charging your headset when you’re not in VR.You can keep your VR headset charged even when in VR, just make sure the cable stretches comfortably to your position.
Stay muted where possible
For clearer audio during your experience, we recommend plugging in your own headphones to your headset.

Keep seated during presentations
When entering a presentation room, please take a seat. Once seated, please refrain from moving around. This helps to keep the attention on the presenter and presentation.
Plug in headphones
For clearer audio during your experience, we recommend plugging in your own headphones to your headset.
Getting started
Watch these videos to get into Gatherings quickly and easily
How to login to Gatherings VR
Finding your feet
Learn the basic controls
How to teleport around the spaces
How to mute and unmute yourself
How to activate your personal menu
How to travel between spaces
Additional help pico
Build up your knowledge with these quick how-to videos
How to activate your quick menu
How to sit down on seats
FAQ
Need some help with your headset or have a burning question you need answered?
Just click on one of the sections below to find the answer.
Your headset
What devices can run Gatherings?
Connect your Oculus Quest 2 or Quest to Wi-Fi
To connect from your Oculus Quest 2 or Quest:
T1. Press the Oculus icon on your right Touch controller to pull up your universal menu.
2. Select Settings then select Wi-Fi.
3. Select the Wi-Fi network you want to connect to then enter the Wi-Fi password.
4. Select Connect.
To connect to Wi-Fi from your Oculus mobile app:
1. Turn on your headset and open the Oculus mobile app.
2. Tap Devices then tap the headset that you are currently using.
3. Tap Wi-Fi then tap the new Wi-Fi network you want to connect to and enter the password.
If you experience trouble connecting your headset to Wi-Fi, try these troubleshooting tips.
Can I replay the Oculus Quest tutorial?
<
<– Press the Oculus button (on right hand controller)
<– Open up the Library
< – Scroll to locate the tutorial apps, “First Steps” and “Fit & Focus”
How do I charge my headset?
My headset isn’t turning on
My sound isn’t working
My head positioning seems off
– Open up the Settings
– Select Guardian
My virtual and actual room don’t line up
Setting up
What speed of Wi-Fi is required to run Gatherings?
Do I need an Oculus account?
How do I install Gatherings VR?
How do I know I’m on the most up-to-date version of Gatherings?
How much space on my headset do I need to download Gatherings VR?
How do I exit and quit Gatherings VR?
Logging in
I have an access code, where do I enter it?
How do I get an access code?
I have been locked-out after a number of failed login attempts
Controls
How can I take a photo or record a video in VR?
How can I mute and unmute myself?
How do I travel to other spaces?
We’d recommend to keep users under 30 in each of the spaces for the most optimum experience.
How do I activate the personal menu?
I can’t reach things in the virtual space because they’re too far away or in a wall
© Copyright 2021 Mesmerise Global Limited. All rights reserved.

Please read the website T’s & C’s and Privacy Policy. Cookie information.
Powered by Mesmerise